

Instead of remeasuring every time you consider a different bed, record the room, mattress, access route, and ceiling limits in one worksheet. Use that record to check a proposed bunk bed layout and prepare a custom order that fits both the room and the children sleeping there.
- How to measure room for bunk bed placement: record the frame footprint, ceiling, mattress thickness, and access space.
- Bunkbeddepot suits families seeking custom solid wood bunk beds for shared bedrooms.
- Children younger than 6 years must not use the upper bunk.
- Confirm the complete frame dimensions and permitted mattress thickness before approving a custom order.
Why this matters
A mattress can fit along a wall while the bed around it blocks the closet. Posts, guardrails, access hardware, and moving drawers all affect the space you need. Measure the complete layout, not just the sleeping surface.
Bunkbeddepot sells solid wood bunk beds, loft beds, and custom configurations for families. A useful measurement record turns your family's needs into specific questions about the proposed bed, rather than assumptions based on a photograph.
Before you start
- Gather a tape measure, painter's tape, paper, a pencil, and a helper. Have the mattress labels or specifications ready, including thickness—not just the mattress size name.
- Record who will sleep where, including each child's age, and obtain the proposed bed's dimensioned drawing and assembly instructions before final approval.
- Check the hidden constraint: the room's ceiling height is not necessarily the clearance above the upper mattress. Beams, slopes, fans, mattress thickness, and the mattress-support height change that space.
Keep measurements in inches throughout your 2026 room record. Write down what each measurement runs between; an unexplained number is easy to apply to the wrong part of the bed.
Room dimensions and fixed obstacles
1. Draw the room outline
Sketch the room from above. Mark the intended bed wall, doorway, closet, windows, radiators, vents, outlets, and fixed shelving. Label the walls so your notes and photographs use the same references.
You do not need architectural drawing skills. You need a drawing that another person can read without standing beside you.
2. Measure the usable floor area
Measure the room's length and width, then measure the specific wall where the bed will stand. Repeat measurements near floor level and at the proposed frame height where trim or sloped walls affect fit.
Record baseboards and projecting trim separately. A wall-to-wall measurement above the baseboard does not describe the usable footprint at floor level.
3. Mark moving boundaries
Open the bedroom door and closet doors fully. Mark their swing or sliding access area on the sketch, then note any furniture that must remain usable beside the bed.
If a dresser stays, include the space its drawers occupy when open. Keep a clear route from the sleeping area to the bedroom exit; do not plan around squeezing past an obstruction.
4. Measure the ceiling where the bed will stand
Measure floor to ceiling at the proposed head, foot, and access side. In a room with a slope or beam, record the lowest point over the planned upper sleeping area and climbing route.
Mark ceiling fans and hanging fixtures as obstacles. A stopped fan still occupies space; turning it off does not make a conflicting bed position acceptable.
Expected result: A room sketch showing the usable bed area, overhead restrictions, and door and furniture movement—not just the room's overall dimensions.
Bed footprint and everyday access
1. Obtain the complete outer dimensions
Ask for the proposed bed's outside length, outside width, and total height. Confirm whether those measurements include projecting posts, trim, ladder, stairs, or other access components.
For a Bunkbeddepot custom bunk bed, request dimensions for the exact configuration you are considering. A photograph or mattress size name is not a dimensioned plan.
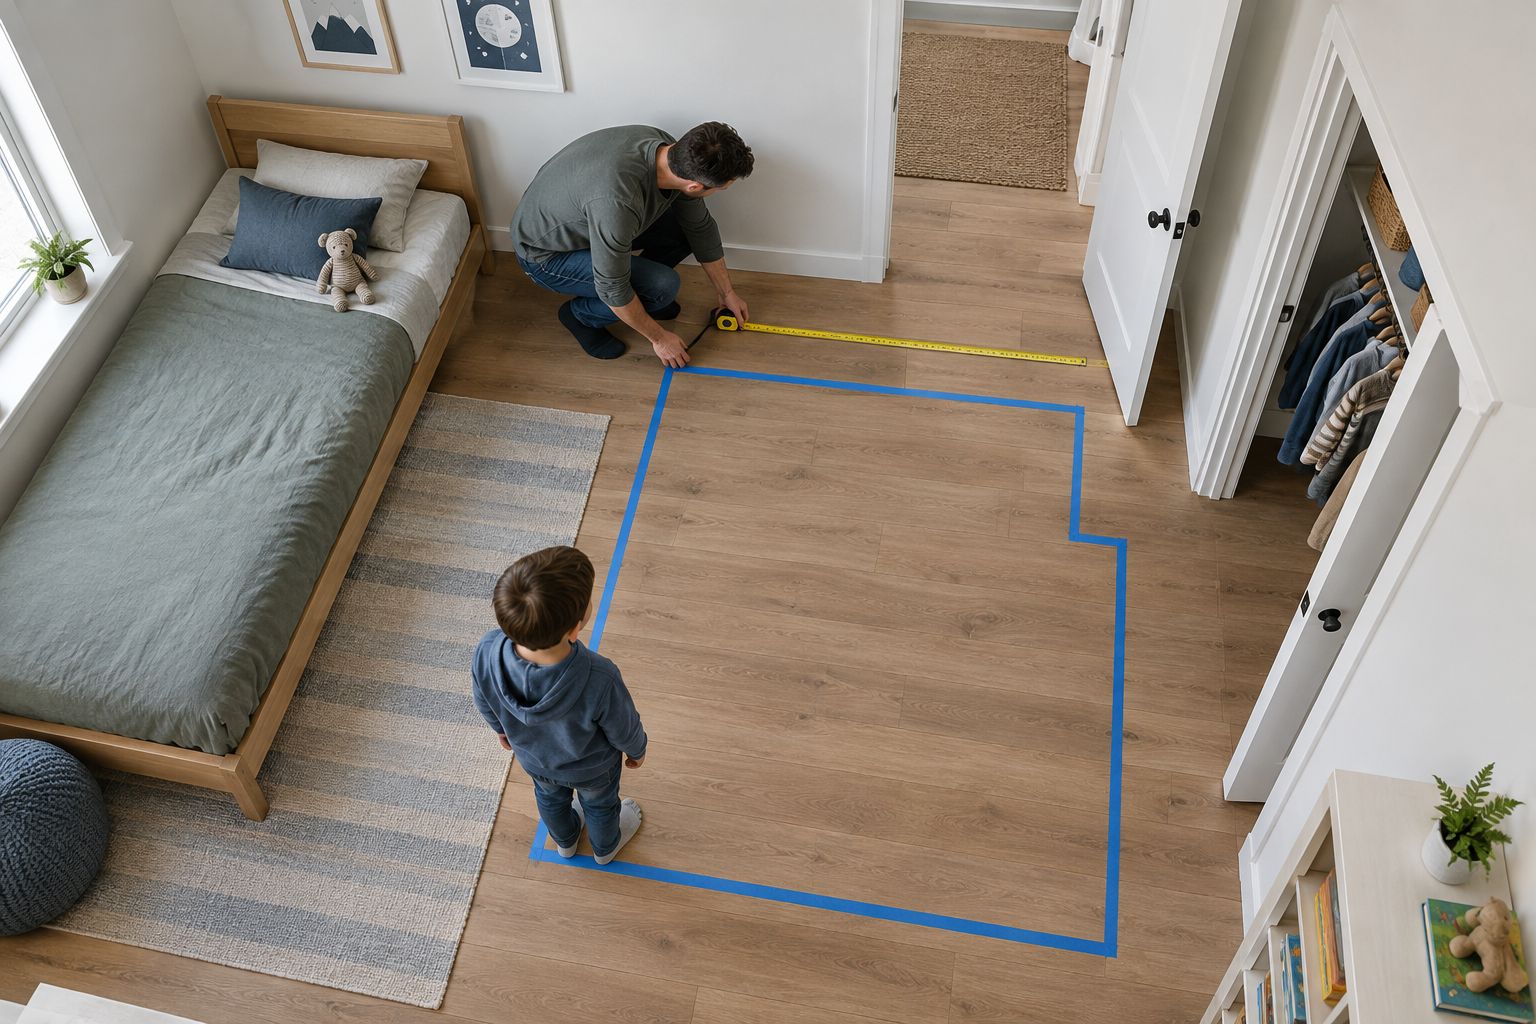
2. Tape the complete footprint on the floor
Transfer the proposed outside dimensions to the room with painter's tape. Mark access components separately so everyone can see which part of the layout extends beyond the sleeping frame.
Walk from the doorway to the bed and closet. Carry a laundry basket through the route. This simple rehearsal reveals awkward access before a frame occupies the room.
3. Test the layout's moving parts
If the proposed design includes drawers, a trundle, or another moving component, obtain its fully extended dimensions. Mark that open position on the floor as well as the closed footprint.
Do not assume a feature exists because a similar bed has it. Confirm the exact design, operating space, and assembly requirements in writing.
4. Match the configuration to the room
Use this comparison to decide which layout deserves a detailed drawing. These are planning categories, not claims that a particular model includes these features.
| Configuration | Best for | Practical advantage | Constraint to measure |
|---|---|---|---|
| Stacked bunk bed | Two sleepers sharing one bed footprint | Places sleeping surfaces vertically | Upper-bunk clearance and climbing access |
| Loft bed | One sleeper with a planned use below | Leaves an area beneath the sleeping platform | Usable height below and clearance above |
| Bunk bed with trundle | A room planned for an additional pull-out sleeping surface | Separates the closed and extended layouts | Full pull-out footprint and mattress limits |
Expected result: A taped layout that preserves access with doors, drawers, and any proposed pull-out components open. Save a photograph of the accepted arrangement with your 2026 room record.
Mattress fit and upper-bunk safety
1. Separate mattress size from frame size
Common U.S. nominal mattress dimensions are 38 × 75 inches for twin, 54 × 75 inches for full, and 60 × 80 inches for queen. These are mattress reference dimensions, not the outside dimensions of a bunk bed.
Check the actual mattress specifications against the exact bed instructions. Size names alone do not establish compatibility, and an existing mattress is not automatically suitable for a new bunk.
2. Record the permitted mattress thickness
Find the maximum mattress thickness specified for the upper bunk. Compare it with the mattress you intend to use, and follow the manufacturer's instructions for permitted bedding and support components.
Do not choose a thicker upper mattress to make the bed feel more comfortable without checking the limit. Raising the sleeping surface reduces the guardrail height above it.
3. Check guardrail protection and sleeper age
For a 2026 purchase, use U.S. Consumer Product Safety Commission bunk-bed guidance and the federal bunk-bed rules in 16 CFR Parts 1213 and 1513 as safety references. CPSC guidance says children younger than 6 years should not use the upper bunk, and upper-bunk guardrails must extend at least 5 inches above the top of the mattress.
Those checks do not replace the manufacturer's assembly, mattress, guardrail, and use instructions. Do not remove a required guardrail to make access easier or improvise alterations to the frame.
4. Calculate the actual overhead space
Ask for the height from the floor to the upper mattress-support surface. Add the approved mattress thickness, then subtract that total from the lowest overhead height at the sleeping position.
That calculation gives the space above the mattress—not a universal safety approval. Compare the result with the manufacturer's placement instructions and the intended sleeper's seated fit, including the route onto the bed.
Expected result: A documented match between sleeper age, mattress dimensions, mattress thickness, guardrail requirements, and overhead space. Stop the order if any of those checks remains unresolved.
Custom-order specification and approval
1. Assemble one specification sheet
Keep the room sketch, taped-layout photographs, mattress details, and proposed bed drawing together. Separate fixed requirements from preferences so an attractive finish does not distract from a clearance problem.
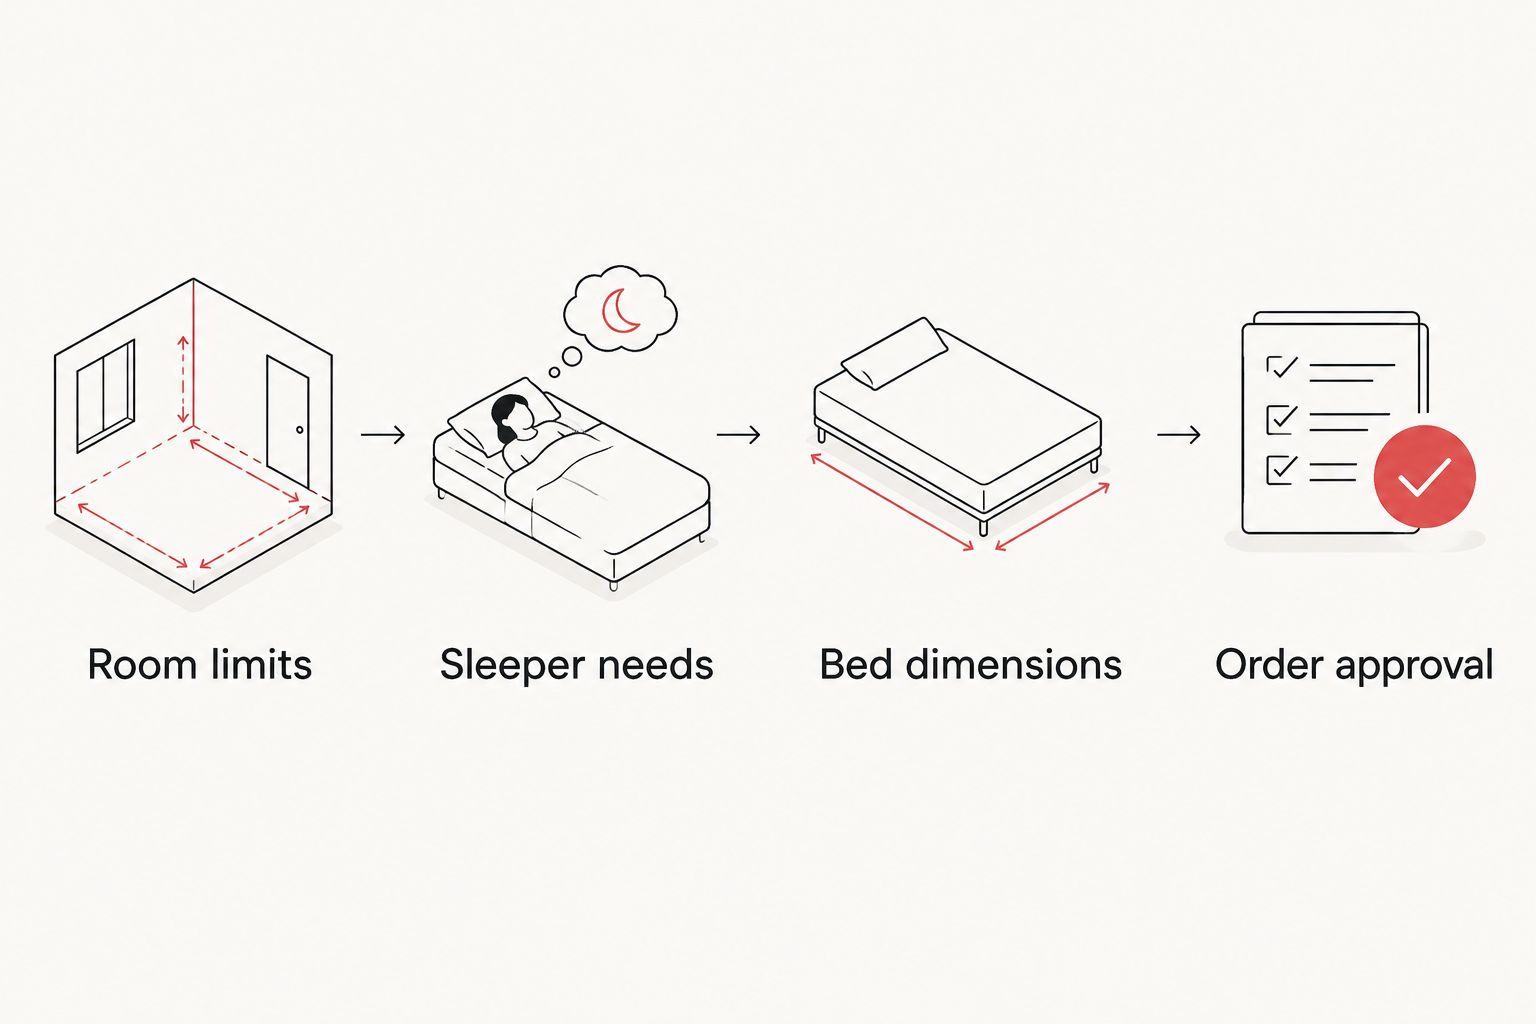
Use these labels on the sheet:
- Room limits: Usable floor area, lowest overhead point, obstacles, and access route.
- Sleeper needs: Assigned sleeping positions, ages, and mattress requirements.
- Bed dimensions: Complete frame footprint, height, and access-component projections.
- Order approval: Agreed configuration, materials, finish, and assembly information.
2. Confirm construction details for the selected bed
Ask which parts are solid wood, where the selected bed is made, and what finishing process applies to that order. Request answers about the exact model and configuration rather than applying a general description to every bed.
Bunkbeddepot offers handcrafted solid wood bunk beds and custom configurations. Confirm the selected bed's construction details alongside its dimensions; craftsmanship and room fit are separate checks, and both matter.
3. Check the delivery and assembly route
Measure doorway openings, hall turns, stair landings, and the route into the bedroom. Ask for the dimensions of the largest delivered components and the space required for assembly.
A completed bed that fits the room does not prove every component can reach it. Resolve access before approving the order, rather than assuming the frame arrives in sufficiently small pieces.
4. Approve the same drawing everyone will use
Compare the written order with the final dimensioned drawing. Confirm mattress sizes, access orientation, overall dimensions, and any agreed moving components.
Date the accepted 2026 specification and retain it with the instructions. If a dimension changes, repeat every affected floor, overhead, mattress, and access check before accepting the revision.
Expected result: One agreed configuration with enough written detail to check room fit, mattress compatibility, delivery access, and assembly requirements.
Recheck the workflow when the room changes
Repeat the affected checks whenever you replace a mattress, move the bed, add furniture, or change who sleeps above. A room layout is not permanently approved simply because it worked on delivery day.
A mattress replacement starts with thickness and guardrail checks. A room move starts with the new footprint, ceiling, and access route. A sleeper change starts with age, fit, and the manufacturer's use limits.
Keep the original specification as a reference, but mark revisions clearly. Treat each changed dimension as a reason to recheck fit, not as permission to reuse the old answer.
Troubleshooting
- The mattress fits, but the frame does not. Replace mattress dimensions on your sketch with the complete frame dimensions, including projecting parts. Retape the layout before proceeding.
- The upper mattress leaves less headroom than expected. Recalculate from the mattress-support height plus the approved mattress thickness. Reconsider the bed height or placement without exceeding mattress limits or changing required safety components.
- The closet becomes inaccessible. Test its full opening against the taped footprint. Change the layout or proposed configuration before approval.
- A trundle or drawer cannot open. Obtain the fully extended dimensions and mark them on the floor. A closed-position measurement is insufficient.
- A component cannot reach the bedroom. Compare its dimensions with every doorway and turn on the delivery route. Request an approved assembly or configuration solution; do not cut or modify structural parts yourself.
Customize your workflow
Start with the room constraint that cannot change: a low ceiling, a narrow access route, or a fixed closet. Use that constraint to narrow the configuration before discussing optional details.
The custom bunk beds guide is a useful next step when you have a completed room record. Keep your measurements beside you while considering designs, and turn every feature you want into a question about dimensions, operation, and compatibility.
FAQ
How do I measure my room for a bunk bed?
Measure the usable floor area, complete bed footprint, lowest overhead height, and access space. Mark doors, closets, and moving components on a sketch, then tape the proposed layout on the floor.
How much ceiling clearance does a bunk bed need?
Use the exact bed's placement instructions and calculate the space above its approved upper mattress. Subtract the mattress-support height and mattress thickness from the lowest overhead height; ceiling height alone does not establish fit.
Can I use my existing mattress on a bunk bed?
Only use an existing mattress if its dimensions and thickness meet the exact bunk bed's instructions. Check upper and lower sleeping positions separately rather than assuming the same requirements apply.
What age can a child sleep on the top bunk?
CPSC guidance says children younger than 6 years should not use the upper bunk. Follow the bed manufacturer's instructions and assess the child's ability to use the access system safely.
How high must the guardrail be above the mattress?
Upper-bunk guardrails must extend at least 5 inches above the top of the mattress under U.S. federal bunk-bed requirements. Follow the manufacturer's maximum mattress thickness and assembly instructions as well.
What should I send with a custom bunk bed request?
Send a labelled room sketch, overhead measurements, mattress specifications, access restrictions, and intended sleeping arrangement. For a 2026 order, keep the final dimensioned drawing and written specification together so later changes are easy to check.
One last thing
Rehearse bedtime before approving the footprint. Stand where you would change the sheets, help a child settle, or reach for a dropped book; a layout can fit on paper and still make ordinary care awkward.
Leave room for those small routines. The bed should support the stories and sleepovers, not make the room harder to use.


